比markdown更强大,如何采用AsciiDoc格式在Github |
您所在的位置:网站首页 › markdown 目录 › 比markdown更强大,如何采用AsciiDoc格式在Github |
比markdown更强大,如何采用AsciiDoc格式在Github
|
本文介绍了如何使用AsciiDoc代替Markdown写文章,并通过 _Travis-ci_ 将AsciiDoc生成为html,最后发布到Github-Pages上. 由于没有找到详细介绍AsciiDoc构建Github-Pages的中文资源, 因此本文记录了笔者关于搭建博客的整个过程.本文介绍了如何使用AsciiDoc代替Markdown写文章,并通过 Travis-ci 将AsciiDoc生成为html,最后发布到Github-Pages上. 由于没有找到详细介绍AsciiDoc构建Github-Pages的中文资源, 因此本文记录了笔者关于搭建博客的整个过程. 本文同时发表在 使用AsciiDoc在Github-Pages上搭建博客 为什么要使用AsciiDoc?AsciiDoc和Markdown一样,是一种轻量级标记语言,用于简单的文章排版和页面生成. Markdown虽然方便,但功能相对较少,不如AsciiDoc强大. Wikipedia列举了 不同标记语言的对比 ,可以看出AsciiDoc是功能最完善的标记语言之一. AsciiDoc官方列举了AsciiDoc和markdown的对比 ,其中AsciiDoc相对于Markdown的优势有: 相同标记场景下, AsciiDoc用的字符数要比Markdown更少. AsciiDoc的格式更加统一. AsciiDoc可以处理任意排列的inline嵌套格式,而Markdown经常难以处理. AsciiDoc可以处理一些Markdown无法处理的场景, 例如单词内的标记, Block-level源代码和block-level images.与markdown一样的是,Github仓库预览时支持AsciiDoc, 也就是说在github写README,wiki和gist时可以使用AsciiDOc. 但是,Github-Pages官方不支持AsciiDoc的Jekyll插件, 因此无法直接上传AsciiDoc文件生成Github-Pages网站,但我们可以用 Travis 自动build的工具生成asciidoc对应的html文件. AsciiDoc+Jekyll博客本地配置Jekyll安装 安装ruby, 下载链接 安装Jekyll并新建网站~ $ gem install bundler jekyll ~ $ jekyll new my-awesome-site ~ $ cd my-awesome-site ~/my-awesome-site $ bundle exec jekyll serve3. 用浏览器打开 http://localhost:4000 查看博客 Jekyll文件结构在 my-awesome-site 文件夹下面,可以看到运行 jekyll new my-awesome-site 初始化生成的所有文件. ├── 404.html ├── Gemfile ├── Gemfile.lock ├── _config.yml ├── _posts │ └── 2021-02-17-welcome-to-jekyll.markdown ├── about.markdown └── index.markdown 配置所需要的包和依赖, 例如Jekyll本身的包 关于博客网站级别的配置,例如网站theme, baseurl和相关插件 所有在 _posts 文件夹下的markdown文件都会作为Post类型的页面来渲染. 所有在根目录下的markdown文件都会作为Page类型的页面来渲染Jekyll通过将markdown文件渲染成静态html文件来生成博客网站的主体内容,其中页面分为两个类别, 分别是Page和Post Pages是Jekyll中用于撰写内容的最基本单元, Pages适合用于单独的内容, 也就是与日期无关并且不是成组的内容. 如果要添加一个新的Page, 只需要在根目录下添加一个新的HTML文件或者Markdown文件, 例如包含了about, index和contact页面的文件及其对应的URL如下: . ├── about.md # => http://example.com/about.html ├── index.html # => http://example.com/ └── contact.html # => http://example.com/contact.htmlPosts正如博客中的文章,可以方便记录书写时间,并且统一展示起来. 与Pages同样, 既可以使用HTML,也可以使用Markdown, 需要注意的是文件必须命名为 YYYY-MM-DD-title-of-post.markdown.AsciiDoc安装配置Jekyll可以直接支持Markdown的渲染, 为了使用AsciiDoc代替Makrdown, 我们要使用Jekyll-AsciiDoc的插件 在Gemfile中添加Jekyll-AsciiDoc的依赖在 Gemfile 中找到 group :jekyll_plugins do , 并加入 gem 'jekyll-asciidoc', 得到如下 Gemfile 文件: source "https://rubygems.org" # Hello! This is where you manage which Jekyll version is used to run. # When you want to use a different version, change it below, save the # file and run `bundle install`. Run Jekyll with `bundle exec`, like so: # # bundle exec jekyll serve # # This will help ensure the proper Jekyll version is running. # Happy Jekylling! gem 'jekyll', '~> 3.8.3' # This is the default theme for new Jekyll sites. You may change this to anything you like. gem "minima" # If you want to use GitHub Pages, remove the "gem "jekyll"" above and # uncomment the line below. To upgrade, run `bundle update github-pages`. # gem "github-pages", group: :jekyll_plugins # If you have any plugins, put them here! group :jekyll_plugins do gem 'jekyll-asciidoc' end激活jekyll-asciidoc插件(可选)修改 _config.yml 文件, 找到 plugins: , 添加 jekyll-asciidoc , 从而激活asciidoc插件 plugins: - jekyll-asciidoc由于jekyll会自动激活 :jekyll_plugins 组中的插件,因此该步骤也可以省略. 重新生成jekyll网站运行以下命令 bundle install bundle exec jekyll serve --livereload # --livereload可以自动更新页面在根目录或者 _posts 下添加 .adoc 文件,就可以看到新生成的页面. 这样,就可以用AsciiDoc代替Markdown来写Pages或者Posts了,只需要用 .adoc 文件替换 .md 文件. 至此,就成功在本地使用AsciiDoc撰写个人博客网站了,下一部分内容会讲述如何将博客通过Github-Pages发布到互联网上. jekyll和AsciiDoc参考链接AsciiDoc安装 AsciiDoc Vscode插件, 可以直接预览AsciiDoc文件 AsciiDoc Writing Guide, 快速上手AsciiDoc AsciiDoc Documentation, AsciiDoc详细介绍 AsciiDoc语法查询手册, 可以快速查询AsciiDoc对应的语法 jekyll Documentation, jekyll详细介绍 jekyll-AsciiDoc插件, 用于在jekyll中使用AsciiDoc jekyll-AsciiDoc-Quickstart, 可以直接在github上Fork, 相当于使用配置好的AsciiDoc-jekyll网站,这样就不需要从头开始,并且手动修改关于AsciiDoc的相关配置了. Github-Pages配置 新建一个仓库,仓库名设置为 USERNAME.github.io , github会自动为该repo启用github-pages 将新建的网站文件夹加入git, 并push到github远程仓库上, 详细可参考 Github-Pages官方教程, 但不需要启用github-pages的gem包.~/my-awesome-site $ git init ~/my-awesome-site $ git add --all ~/my-awesome-site $ git commit -m "First commit" ~/my-awesome-site $ git remote add [email protected]:USERNAME/USERNAME.github.io ~/my-awesome-site $ git push -u origin master3. 之后就可以在 https://USERNAME.github.io 上查看新建的博客, 对于markdown写的文章,可以正确渲染. 但对于AsciiDoc写的文章,无法正确查看. 由于 Github-Pages没有将 jekyll-AsciiDoc 的插件加入到白名单中, 因此我们需要采用CI来完成AsciiDoc文件的渲染. 使用CI进行构建和上传Method 1. 使用Travis配置我们可以通过Travis-CI调用Rake-jekyll来构建jekyll网站并上传到对应的仓库中. 配置Rake-jekyll 将 gem 'rake-jekyll', '~> 1.1.0' 加入到 Gemfile 中 新建 Rakefile 文件, 并将下面内容复制到其中require 'rake-jekyll' # This task builds the Jekyll site and deploys it to a remote Git repository. # It's preconfigured to be used with GitHub and Travis CI. # See http://github.com/jirutka/rake-jekyll for more options. Rake::Jekyll::GitDeployTask.new(:deploy) do |t| t.committer = 'Jekyll Publisher ' t.deploy_branch = 'gh-pages' end 重新安装依赖 bundle install 我们可以直接运行 bundle exec rake deploy 来将渲染好的网站push到github远程仓库中的 gh-pages 分支上. 在github上对应的repo → setting → Options → Github-Pages中设置branch为 gh-pages 并save. 我们再次打开 https://USERNAME.github.io , 就可以看到使用AsciiDoc撰写的文章了但这样每次更新博客都要手动调用 bundle exec rake deploy , 我们可以通过Travis-CI帮我们自动完成这一任务. 配置Travis-CI 登录 https://travis-ci.com/ 网站, 使用github账号登录并且进行Permission的授权 在 https://travis-ci.com/account/repositories 中进行 sync, 将对应的 repo 加入到Travis-CI管理的项目中. 新建 .travis.yml 文件, 将以下内容复制到文件中language: ruby rvm: 2.7.2 os: osx before_install: - gem install bundler install: bundle install --deployment script: bundle exec rake deploy 我的电脑系统为MacOS Big Sur, 为了保持环境一致设置了 os: osx , 也可以设置为 os: linux 等, 但不同情况可能会遇到不同的问题, 注意看错误信息 . 安装travis gem install -n /usr/local/bin travis 在 https://github.com/settings/tokens/new 中生成新的token, 可以设置合适的权限 将github token加密写入到 .travis.yml 文件中 travis encrypt GH_TOKEN= --add env.global --com (这一步可能需要使用命令行登录) 将所有文件更新commit并且push到github上 在 https://travis-ci.com/ 中查看build的log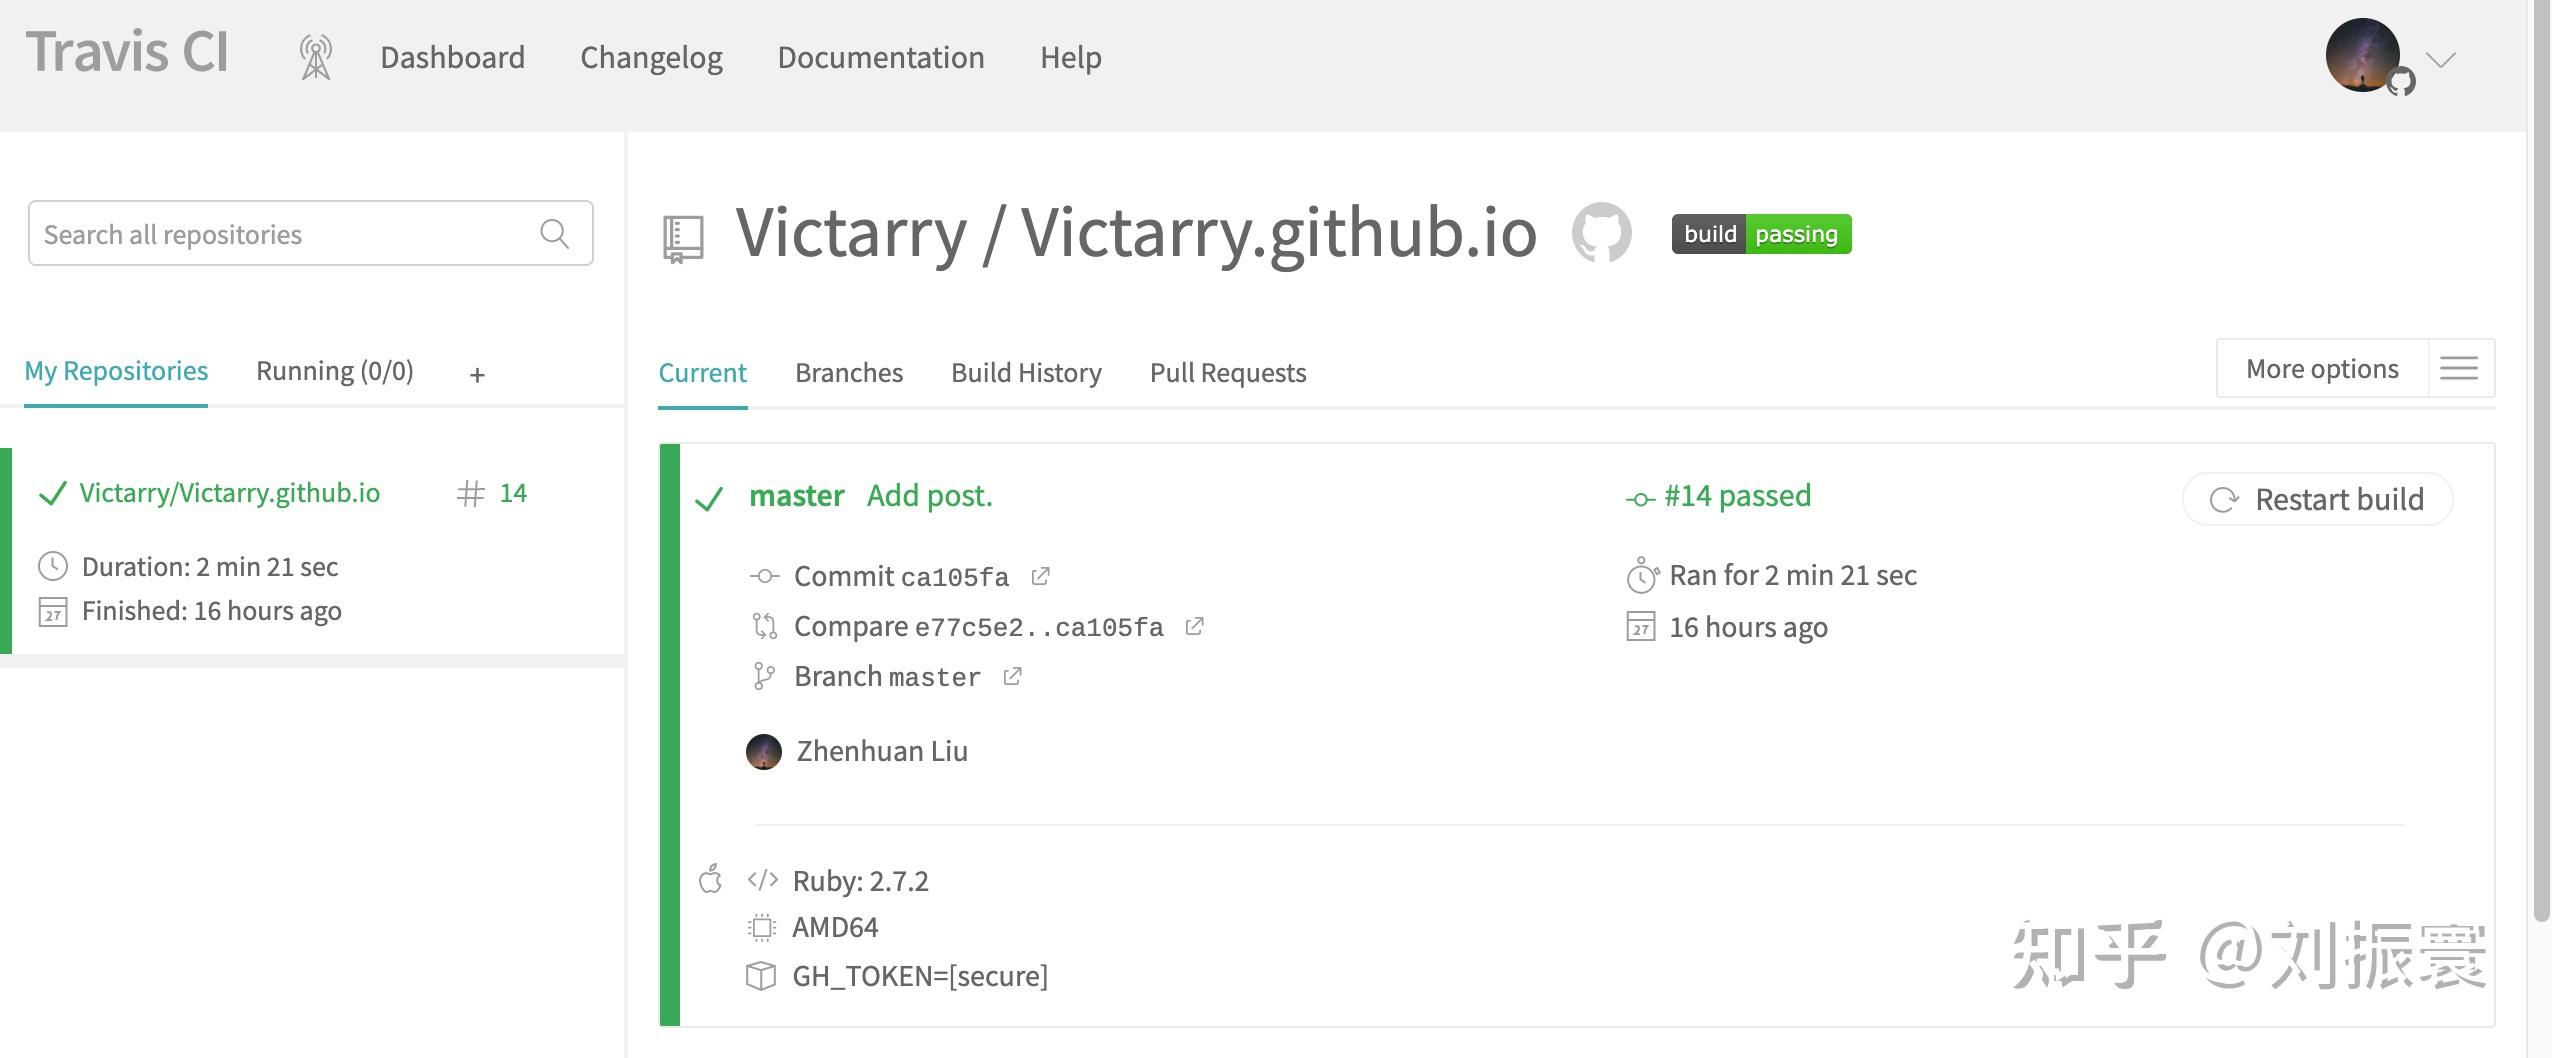 travis build成功结果 build成功的话就可以在 https://USERNAME.github.io 中看到生成的网站 Method 2. 使用Github-Actions配置 travis build成功结果 build成功的话就可以在 https://USERNAME.github.io 中看到生成的网站 Method 2. 使用Github-Actions配置TODO https://jekyllrb.com/docs/continuous-integration/github-actions/ 其他问题显示latex公式添加mathjax link 新建_includes/mathjax.html, 并将下列代码复制到文件中 MathJax.Hub.Config({ messageStyle: "none", tex2jax: { inlineMath: [["\\(", "\\)"]], displayMath: [["\\[", "\\]"]], ignoreClass: "nostem|nolatexmath" }, asciimath2jax: { delimiters: [["\\$", "\\$"]], ignoreClass: "nostem|noasciimath" }, TeX: { equationNumbers: { autoNumber: "none" } } });2. 在layout模板中的 内include上述文件, 如果添加到default 的layout中, 那么可以新建 _layouts/default.html, 复制下列代码 {%- include head.html -%} {%- include mathjax.html -%} {%- include header.html -%} {{ content }} {%- include footer.html -%} 在AsciiDoc中添加公式 启用stem, 在 metadata 中加入::stem: 使用行内公式(inline formula) stem:[C = \alpha + \beta Y^{\gamma} + \epsilon] 使用块公式(block formula) [stem] ++++ C = \alpha + \beta Y^{\gamma} + \epsilon ++++代码高亮 在 Gemfile 中添加pygments依赖 gem 'pygments.rb', '~> 2.1.0'2. 在 _config.yml 中添加下列代码 asciidoctor: attributes: - idprefix=_ - source-highlighter=pygments - pygments-css=class - pygments-stylesheet=css/asciidoc-pygments.css3. 在theme对应的template中的 tag下加入 asciidoc-pygments.css 作为stylesheet Mardown和Asciidoc转换工具https://tinyapps.org/blog/201701240700_convert_asciidoc_to_markdown.html Further Reading静态网站Hugo, 除了Jekyll之外另一个流行的静态网站生成器博客发布平台Ghost Medium 动态网站typecho WordPress |
【本文地址】
今日新闻 |
推荐新闻 |